Face Recognition with CNN and Raspberry Pi (WIP)
Last year, my roommate, who was an electrical engineer, became interested in smart home systems and started making small IoT devices. During a conversation of ours, we decided it would be really cool to set up a face recognition system at our front door. How can I teach a Raspberry Pi to recognize me? There wasn’t any available tutorials online (everthing I found was using Eigenface - so outdated!), so I thought why not using the powerful Convolutional Neural Networks? Then came this project.
On this page, I will go over the important theory and skills involved and walk you through about to build a face recognition module. My code can be found in this repository.
After I finished this project, it was integrated by a ECE hands-on project course at UC San Diego. I was excited that young students could have the opportunity to learn some hands-on skills in deep learning and computer vision.
Project Steps
- Step 1: Understand the Problem
- Step 2: Face Detection with OpenCV
- Step 3: What’s a Convolutional Neural Network?
- Step 4: Data Collection
- Step 5: Train a CNN
- Step 6: Connect to Raspberry Pi
Step 1: Understand the Problem
This problem can be divided into two smaller problems - face detection and face recognition. First we need to know if a given image contains a face and where the face is located, and then we can recognize who the person is. You may also combine them into one problem but you will need a more complex model. For now, we will start with a more straight-forward method.
Face detection is actually a regression problem – you need to know where a face is in an image with coordinates. The face detection function provided by OpenCV is accurate for frontal faces, which is what we are interested in, so we will just use that. Face recognition is a standard classification problem - you need to guess which class, in this case person, a face image belongs to. Recognition is the part where we will need to create a dataset and train our own CNN model.
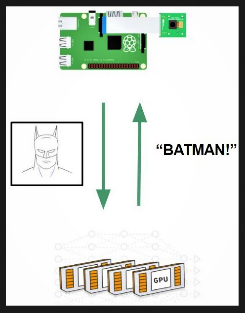
To set up the system to incorporate a Raspberry Pi, I plan to use the Pi as a local data collector to detect faces and send a face image to a remote server and the remote server will predict who the person is and returns the result to display on the Pi. I will use a Pi Camera to take images as it is more compatible with an RPi than USB webcams. If this system works well, we can then easily intergrate it in a smart home system.

Step 2: Face Detection with OpenCV
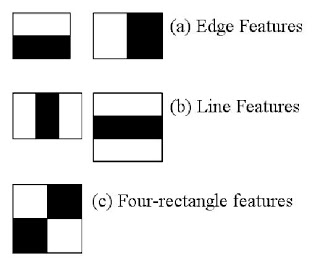
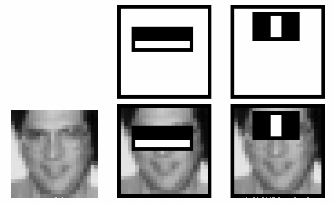
OpenCV is a nice libray that allows you to perform a lot of basic operations for image processing and computer vision. It has a nice face detection function. On a higher level OpenCV provides a Harr Cascade Classifier, which with pre-trained information of faces we can use to detect faces. The Harr Cascade classifier uses different levels of feature extractors across an entire image to locate regions of interest (faces, in this case). As the classifier goes to a higher level, the feature extractors become more complex, contain more information and are more accurate in locating regions on interest. For example, feature extractors may start with edges, and then curves, and then more detailed features that resemble specific face features such as hair and eyes.
The diagrams below is a good example of how the classifier works. They are borrowed from the OpenCV documentation, which also has a detailed explanation on the classifier.


I tried the function on a few images of myself and found the results satisfying. One thing to note is that OpenCV only supports frontal face detection. Faces that are tilted or side-ways to a small degree are also allowed. This limitation is ok for our purpose, although a little restricting - we just need to recognize frontal faces.
Now I need to apply it on a real-time video stream, because the device should be able to automatically detect faces coming into the view, otherwise it would be some trouble for users to manually take an image.
After some research on RPi and Pi Camera, here’s how I detect faces on a read-time video stream. For simplicity, I used pseudo code for some parts. Again the detailed code is linked at the begining of this article.
# initialize face detector
cascade_path = 'haarcascade_frontalface_default.xml'  # this is the actual path on your local machine
face_cascade = cv2.CascadeClassifier(cascade_path)

# initialize camera, frame size, etc

# run video stream
for frame in camera.capture_continuous():

    # detect faces in frame
    faces = face_cascade.detectMultiScale(frame)

    # draw bounding rectangles on detected faces
    for coordinates in faces:
        cv2.rectangle()

    # display the processed frame
    cv2.imshow('Output', frame)
Now we’ve solved the first part of the problem!
Step 3: What’s a Convolutional Neural Network?
In order to achieve high accuracy on face recognition, I decided to use Convolutional Neural Networks (CNNs). CNNs are extremely powerful tools in computer vision to solve problems including image classification and segmentation. If given a large dataset with high variability, CNNs are able to learn complex features very well. For this project, we are using a CNN to classify faces.
How does a CNN work? To give you some intuitive ideas:
- A CNN has convolutional and fully connected layers. The last layer outputs the result for different classes - the probability of being in various classes. Here’s an example of a CNN’s architecture:

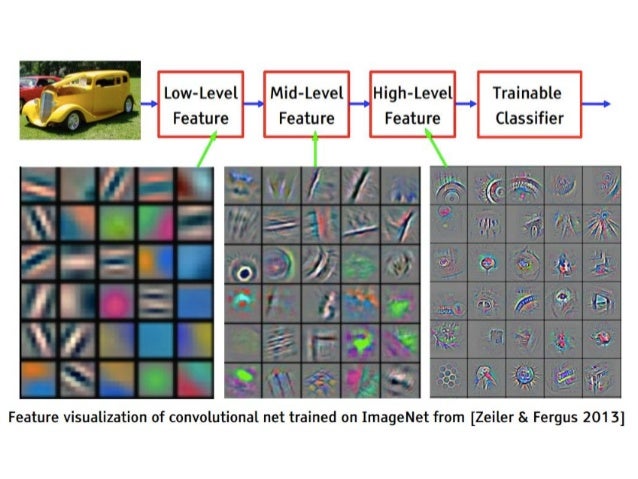
- Convolutional layers learn 2D visual features from the training images. As we go deeper into the network, the features become more complex. For example, we want the CNN to learn important features of faces, such as different eyes, hair, nose, mouth, shapes of faces, and so on. The CNN can assign those features weights and different combinations of weights with features correspond to different faces. Here’s a good example of features learned by a CNN:

- During training, the network will adjust the weights to achieve the best classification result. CNNs adopt Gradient Descent method to find the best values of weights. We can think of the classification problem as a loss function (difference between predictions and ground truth) with respect to w (weights). Our goal for training is to find the w that minimizes the loss function. Most of the time, we don’t have closed form solutions for w. Hence, we have to use Gradient Descent to get to the minimum point step by step. Gradient Descent is an iterative procedure to adjust values based on current gradient. Here’s a visualization of Gradient Descent.
- A trained model contains the best feature representation of classes, and it should work well on new images of those classes, meaning that a CNN should be able to tell that a new image of me is me based on other images it learned on during training.
Step 4: Data Collection
One of the reasons why deep learning methods are so popular and effective is that they use a large amount of data. By learning from a lot of data, neural networks are expected to generalize and find the crucial features of the data. For this step, I will make a face dataset by combining available online data and your own images.
Let’s first start with finding some face data online. You might wonder why we need to use other people’s face data when we can just create our own data. When training a neural network, you want to make sure you have sufficient number of images per class as well as sufficient number of classes. The limitation with using only your own data is that most likely you can get data of only a few people. If you have a lot of classes (in this case, faces), your network will be able to learn the truly unique features for each class, instead of something random or trivial.
For example, if you have one class of a guy with short hair and another class of a girl with long hair, the neural network might just learn to differentiate them with the hair. Now, what if the classifier sees a new person, who happens to have long hair as well? This new person is probably recognized as the girl, which is not correct. However, if you have multiple people in the dataset, the network will be able to learn other features to form a better representation of the faces.
The second thing you need to think about when finding a dataset is how much intra-class variability the dataset offers. Each face should contain images with different orientations, angles, lighting conditions and face expressions. I decided to use the Yale B Dataset. Do you observe the inter-class and intra-class variability?

Now I need to add my own face images to it. You need to create images with high variability, just as mentioned in the previously. A few hundred images with various lightings, angles, face expressions will do the trick. For this project, I don’t recommend using images that do not show a complete face. To start off, you might want to try to make the task easier for the CNN. In this way, if you encounter problems (e.g. very low accuracy), then you would know it should not be the problem of the dataset but something else.
Before moving on to the next step, we need to partition the dataset into training, validation and test sets. They should take 70%, 10% and 20% of the dataset respectively. Make sure each set has unique images, otherwise the validation accuracy and test accuracy might be misleading.
Step 5: Train a CNN
When training a network, you have two options: training from scratch and finetuning from a trained model. Training from scratch takes a lot of time as all the weights are initialized as random. For most problems, it might take a couple weeks to fully converge. Finetuning, on the other hand, starts with pretrained weights from ImageNet dataset. ImageNet has over 14 million images across 1000 different categories. Models trained on ImageNet have learned a huge number of different features that can be transferred and applied in other image recognition problems. I will finetune a CNN with ImageNet weights to make the weights more suitable for our face recognition problem.
In this project, I will use a CNN called VGG16. Here’s the architecture of VGG16:

I’m using Keras (Tensorflow backend) for this project. Keras is a deep learning framework great for making prototypes and it’s easy to get started. Keras has built-in model for VGG16 available. I’m going to load a VGG16 model with ImageNet weights without the fully connected layers at the top. I will add new layers and then train on those layers. Here’s how you do it:
# build the VGG16 network
base_model = VGG16(weights='imagenet', include_top=False, input_shape=(224,224,3)))
base_out = base_model.output
flat = Flatten()(base_out)
hidden = Dense(256, activation='relu')(flat)
drop = Dropout(0.5)(hidden)
predictions = Dense(NUM_CLASSES, activation='softmax')(drop)
model = Model(inputs=base_model.input, outputs=predictions)
model.compile(optimizer=optimizers.SGD(lr=1e-4, momentum=0.9), loss='categorical_crossentropy', metrics=['accuracy'])
You can use model.summary() to check if your model prints out the correct architecture you want.
Then we need to read images and their labels and save them as numpy ndarrays. Once it’s done, we can start the training process! Training only takes one line. When you are training, the accuracy should increase and loss should decrease. The final accuracy should be close to 99%. After it finishes training, save the weights locally for future use.
# train
model.fit(X_train, Y_train, batch_size=16, epochs=10, validation_data=(X_val, Y_val))
# save model weights
model.save('face_recognition_vgg16_weights.h5'))
Step 6: Connect to Raspberry Pi
Now we’ve come to the final piece of the puzzle – put everything together. What we want to achieve here is to build a system to send a newly taken face image to the cloud (AWS) and then fetch results from it. I will walk you through a basic way by using secure copy (scp). You can reference the following documentation from AWS: http://docs.aws.amazon.com/AWSEC2/latest/UserGuide/AccessingInstancesLinux.html Follow the “Transferring Files to Linux Instances from Linux Using SCP” section from the AWS tutorial to get familiar with the secure copy method.
Now you know how to use SCP to send and fetch data from AWS instance. The next step is to create an automatic system. My example here works as below:
Set up an infinite loop on AWS to wait for new images. It checks a specific directory. Once a new image is found, the trained neural network is deployed and predicts the label of the face image. The prediction results are saved in a result.txt file. Wait for about 10 seconds, which should allow RPi to fetch the results, and then delete the face and result files.
On Pi, take an image, get confirmation from user, and send it to AWS. Wait a few seconds. Then fetch the result.txt file from AWS instance and presents the results on a display with the face. After that, delete the face and result files.
We can simply execute a command line in Python by using subprocess.call(command) where command is a list of strings you type when you run shell command. To check if there is new data (image or results) available, you can designate a local directory for storing the data and check that directory frequently to see if there is new file available.
References (Thank you!)
- https://docs.opencv.org/3.3.0/d7/d8b/tutorial_py_face_detection.html
Picture Credits
- https://docs.opencv.org
- https://image.slidesharecdn.com/case-study-of-cnn-160501201532/95/case-study-of-convolutional-neural-network-3-638.jpg?cb=1462133741
- http://d3kbpzbmcynnmx.cloudfront.net/wp-content/uploads/2015/11/Screen-Shot-2015-11-07-at-7.26.20-AM.png
- https://qph.ec.quoracdn.net/main-qimg-b7a3a254830ac374818cdce3fa5a7f17
- https://www.mathworks.com/matlabcentral/mlc-downloads/downloads/submissions/45750/versions/1/screenshot.jpg
- https://i.stack.imgur.com/3R0Kd.png